How to Point a Domain or Subdomain to WordPress in GHL
Updated March 2, 2023
Misconfigured DNS is one of the most common reasons WordPress sites fail to connect properly inside GoHighLevel, causing delays and downtime. This guide walks you through pointing a domain or subdomain to WordPress in GoHighLevel, whether you are creating a new site, setting a root domain, or migrating an existing WordPress installation without interruption.
To incorporate your system, you might consider using WordPress. Whether you’re creating a new WordPress site, transferring an existing one, or adding more domains, configuring the DNS to direct to your WordPress is necessary. Follow these instructions to understand how to establish this connection:
Part 1: Creating a new WordPress website
Step 1: Creating a new WordPress blog
- Navigate to Sites > WordPress
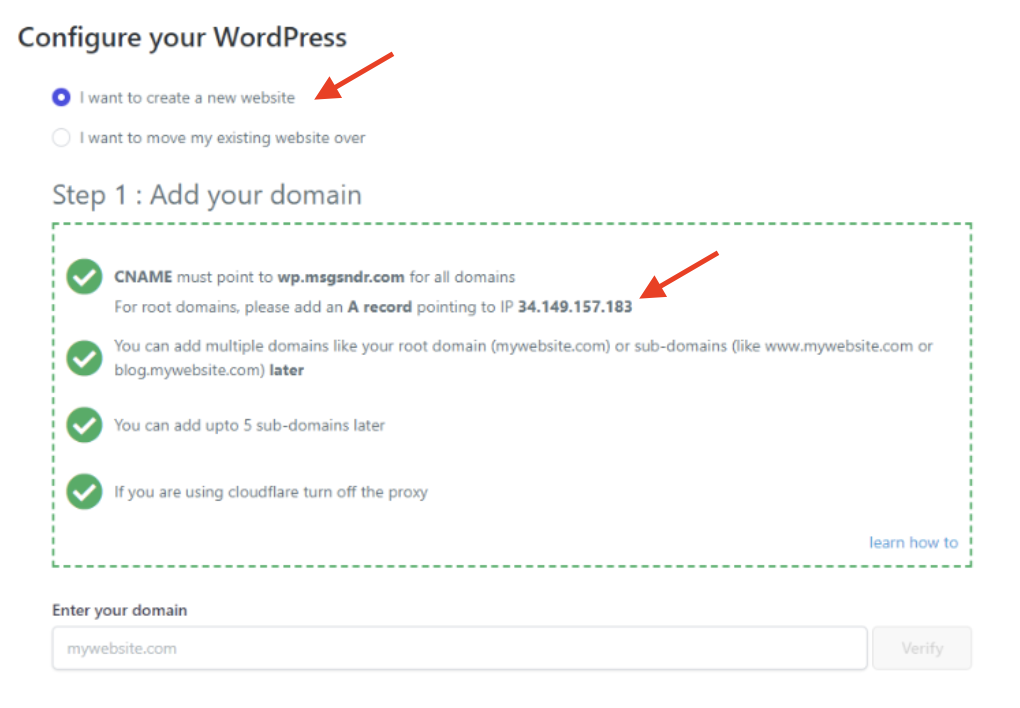
- Choose the option “I want to create a new website” under “Configure your WordPress” to establish a domain like blog.thedemoaccount.com. This enables you to set up your own website.
- Access your domain provider’s login page (e.g., GoDaddy, CloudFlare, NameCheap, etc.).
- Inside your domain provider, create a CNAME record for the WordPress site (e.g., blog.thedemoaccount.com) and direct it to the value indicated on the screen.
- NOTE: The value of a CNAME and A record may be different. Check the values before adding the record.
- The completion of DNS changes might take up to 48 hours for certain domain providers, but it may be instant for others. You may use a tool like dnschecker.org to verify if your DNS changes have been implemented.
- After the process is done, on the Sites > WordPress page, you can input your domain, select “Verify,” and observe a “Domain Detected” success notification.
- If the domain isn’t pointed accurately, an error message, such as “Domain not found,” will appear. The following are some of the most common causes:
- The domain name may contain a typo.
- The DNS changes may not have completed yet (it could take up to 48 hours).
- The DNS configuration may not be set up correctly. In such a case, you should contact your domain provider or host.
- There may be conflicting records for the same subdomain. For example, blog.thedemoaccount.com may have a CNAME record pointing to wp1.mgsndr.com, but it may also have an A record pointing somewhere else. You will need to remove the duplicate record so that your DNS can identify where to direct the domain link.
Step 2: Setting up a new WordPress as your Main Website
- You can use the same process as mentioned before to set up a WordPress website as your primary website with a domain like www.thedemoaccount.com or thedemoaccount.com.
- The steps are similar, but there are some key differences. You need to point an A-record for your root domain (without www.) to the WordPress site’s address, and point a CNAME for your subdomain (with www.) to the mentioned value (such as wp2.msgsndr.com).
Part 2: Migrating an Existing Website
To migrate your existing WordPress site to this system, you need to change the DNS twice. This two-step process ensures that your live site doesn’t experience downtime while you migrate it.
Step 1: Migrate Your Site
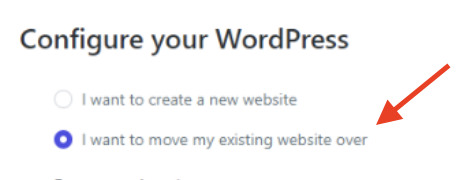
- Go to the WordPress section in Sites and select the option “I want to move my current website” among the two options available.
- When starting the process of moving your website to a new location, you will need to create a fake CNAME record and direct it to a random value. This is done to confirm the domain name associated with your backup file and to assist the system in verifying its origin.
- After the migration process is finished, you will receive a temporary domain that resembles wp-the-the-demo-account-com.msgsndr.com. This domain enables you to preview your transferred website.
- Access your WordPress administration portal and evaluate any customizations made to ensure your content with the transferred website.
Step 2: Divert Traffic From Old Website to Newly Migrated Website
- Direct your website’s live traffic domains, such as:
- thedemoaccount.com (root domain to the given address via A record)
- www.thedemoaccount.com (subdomain to the given value via CNAME)
- Blog.thedemoaccount.com (subdomain to the given value via CNAME)
- Once the changes to your domains have propagated (this can take up to 48 hours), you will need to add them as additional domains in the Sites > WordPress section.
- Afterward, log in to the WordPress admin dashboard, click on “Settings” from the left-hand menu, select “General,” and modify the Site URL and WordPress URL from wp-the-demo-account.msgsndr.com to your desired primary domain.
- All other domains will redirect to this domain.
Keep learning