A. Making Shipping Details Hidden, Optional or Mandatory
This section offers a detailed, step-by-step guide for store owners to customize the Shipping Details section on their eCommerce checkout
Why Customize Shipping Details in Checkout?
Customizing the Shipping Details section allows you to:
Enable faster checkouts by asking for only relevant information.
Simplify the customer experience to improve conversion rates.
Meet the specific requirements for shipping rate calculations or live rates integration with platforms like Shippo.
Step-by-Step Guide
1. Access the Checkout Page Editor
Go to your Sites > Stores > Select your Store.
Select Edit the Checkout Page for editing.
2. Select the Checkout Element
Click on the Checkout element within the page editor.
This will open the settings menu on the right side of the screen.
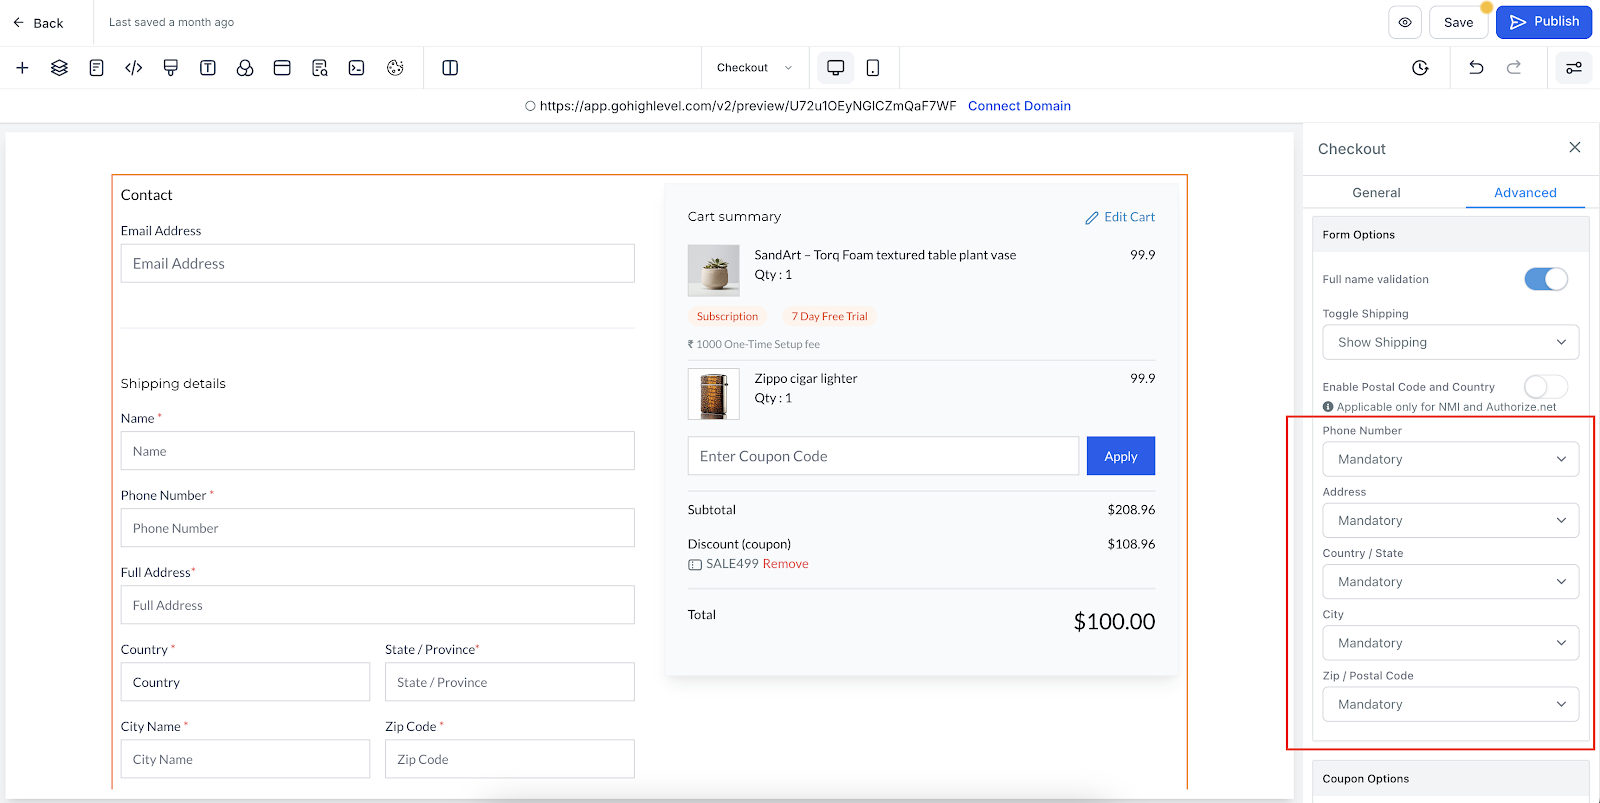
3. Navigate to the Advanced Settings
In the settings menu, locate and click on the Advanced Section.
Look for the Form Options subsection.
4. Customize the Fields
In the Form Options, you’ll see a list of fields under the Shipping Details section:
Phone Number
Address
Country/State
City
Zip/Postal Code
For each field, you can choose its status from the dropdown menu:
Hidden: The field will not appear on the checkout page.
Optional: The field will be visible but not required to complete the checkout.
Mandatory: The field will be required to proceed with the checkout.
5. Save and Publish
Once you’ve customized the fields to your preference, click Save.
Publish the changes to apply them to your live store.
Key Considerations
1. Impact on Shipping Rates
Some shipping carriers calculate rates based on specific fields like Address, City, and Zip/Postal Code. Ensure all necessary fields are retained as mandatory if you rely on accurate shipping rate calculations.
2. Live Rates Compatibility
If you’re using multi-carrier platforms like Shippo, all fields need to be completed by customers to retrieve live shipping rates.
3. Faster Checkout Process
Reducing the number of mandatory fields can streamline the checkout experience for your customers, encouraging higher conversion rates.
FAQs
Q1: Can I customize fields for specific products or categories?
No, this feature customizes the Shipping Details section globally for the checkout page.
Q2: What happens if I hide a field?
Hidden fields will not appear to customers on the checkout page, and no data will be collected for those fields.
B. Additional Notes in Checkout Page for Ecommerce Stores
This guide will walk you through understanding and using the Additional Notes feature on your ecommerce store’s checkout page. Follow the steps below to enable, personalize, and manage it efficiently.
Feature Overview
The Additional Notes feature enables store owners to collect specific details or instructions from customers at checkout. This may include gift messages, special delivery requests, or other personalized notes.
Key Features
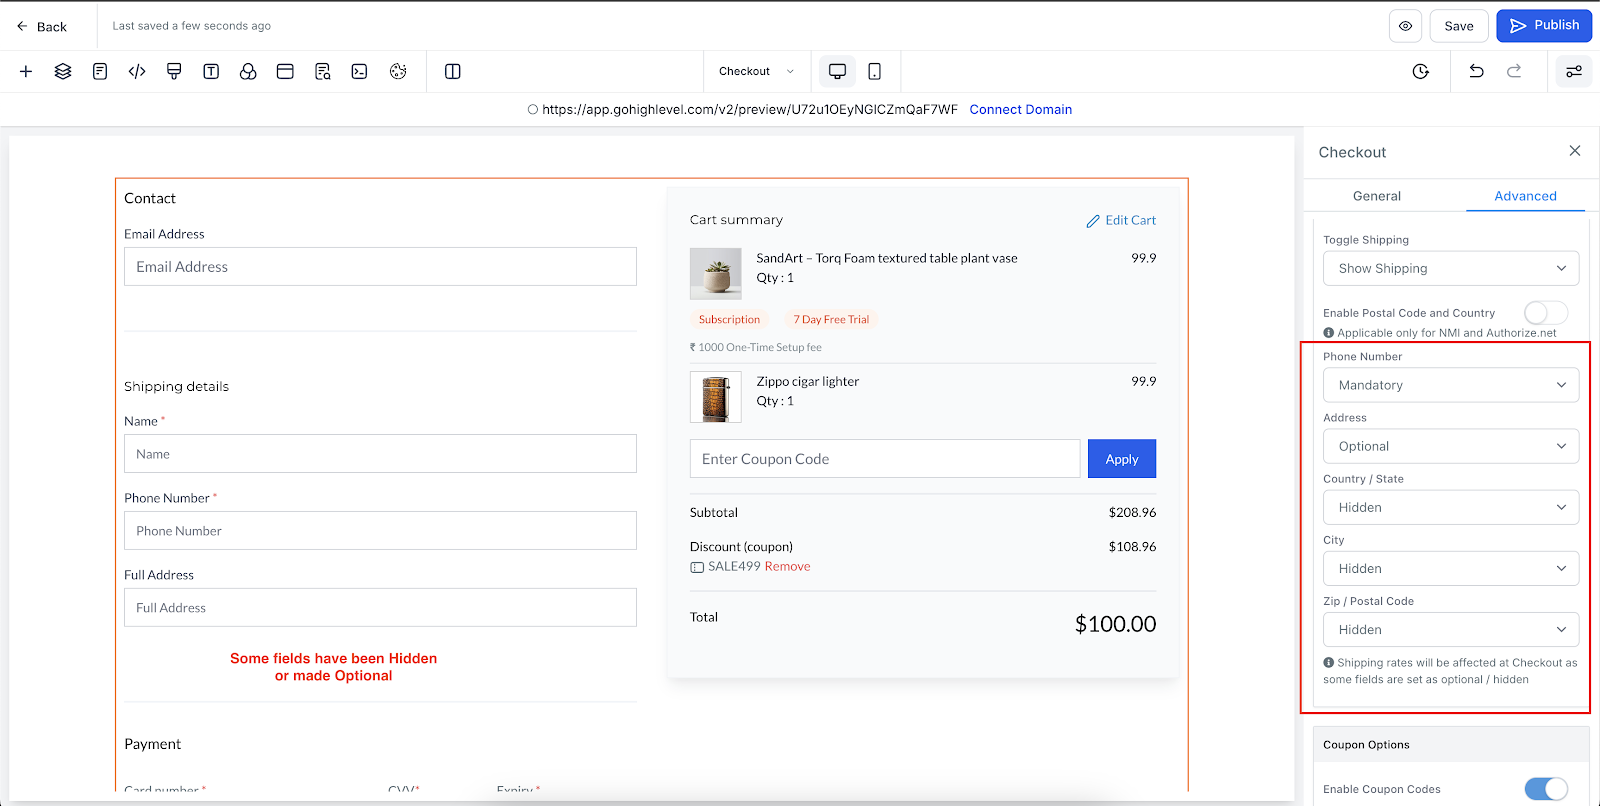
Enable/Disable Toggle
A toggle button labeled “Enable Notes at Checkout” is available in the Checkout Settings.
Store owners can activate or deactivate the Notes section based on their store’s needs.
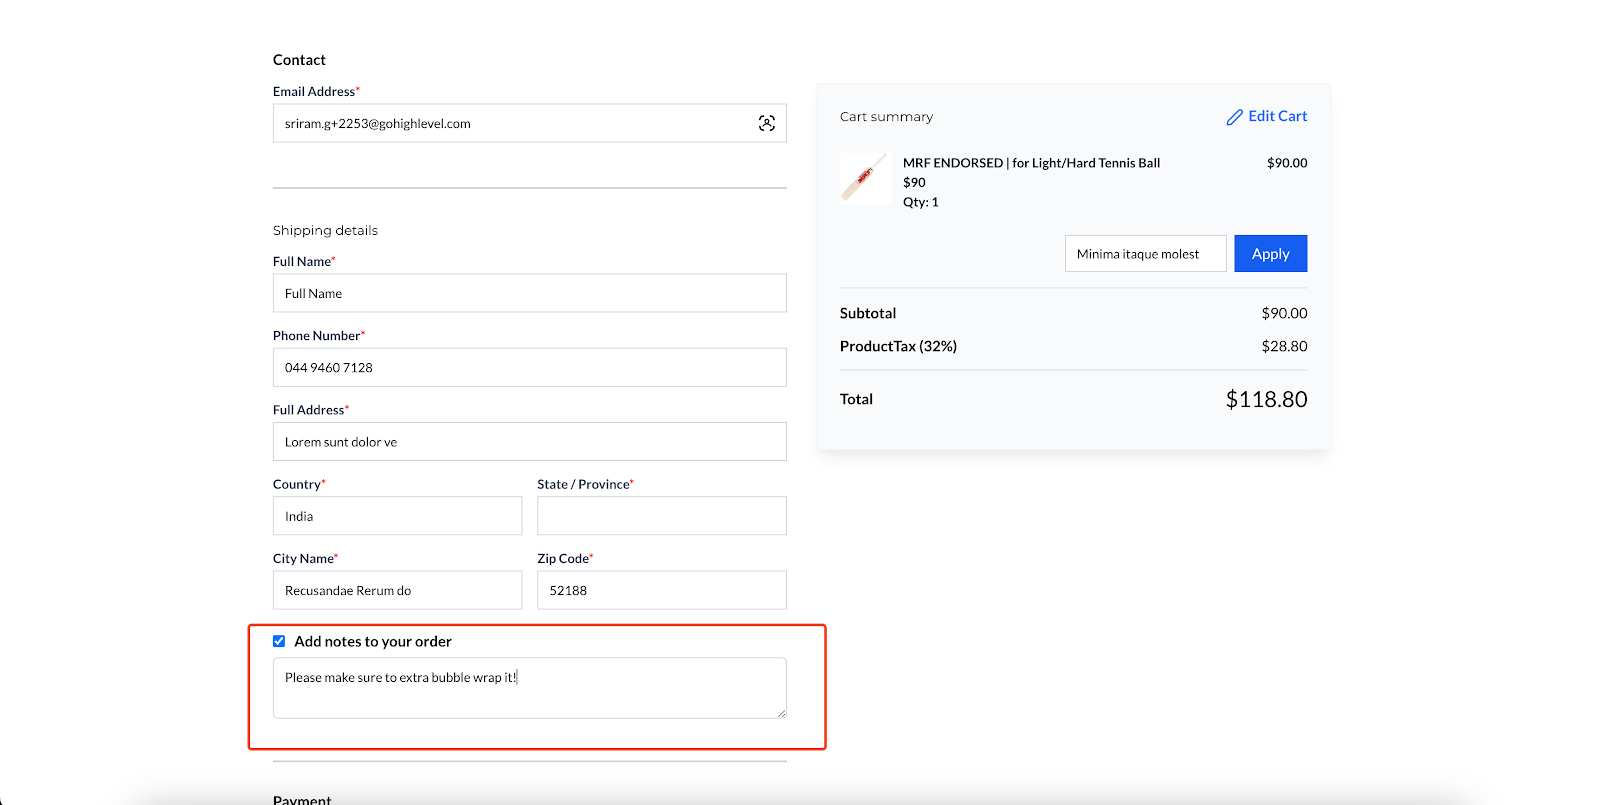
Notes Checkbox Flow
A checkbox appears between the Shipping Details and Payment Options sections on the checkout page.
By default, the checkbox is unchecked.
Customers can check the box to add additional notes in the textbox.
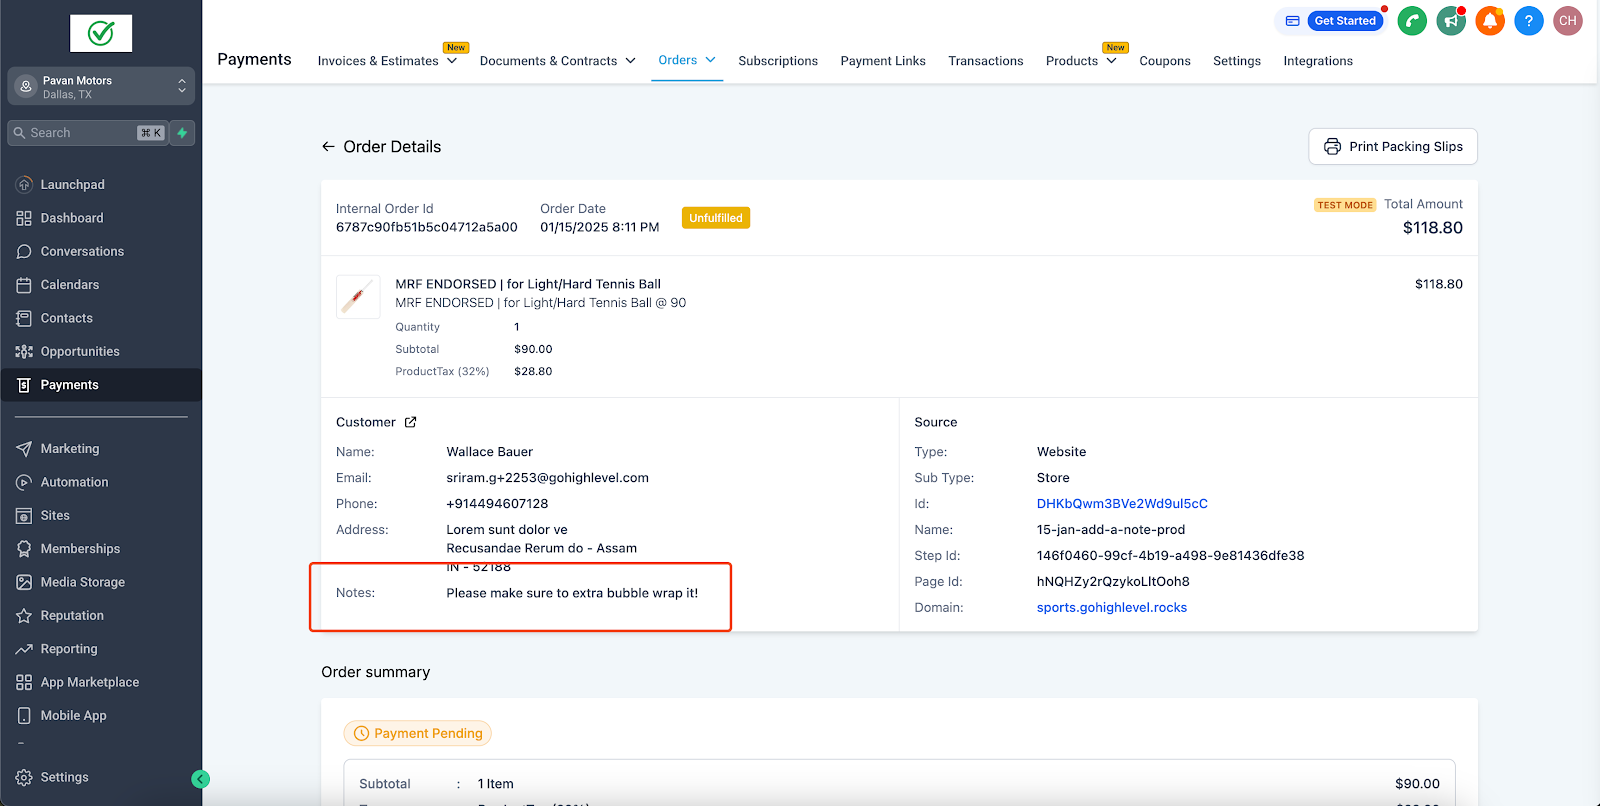
If the checkbox is selected but no text is entered, the Notes section in the Order Details will appear blank.
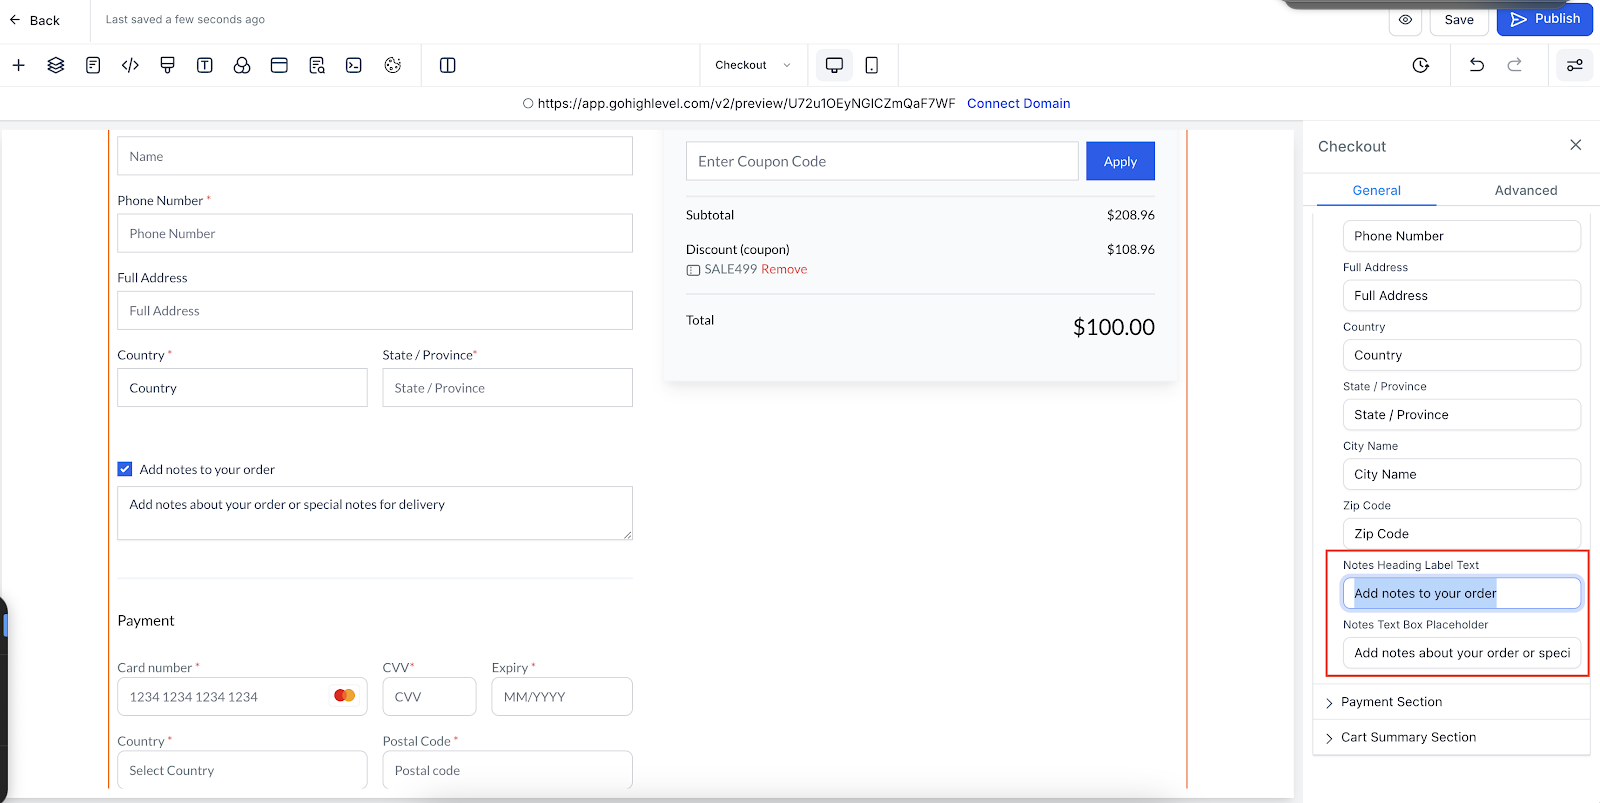
Customizable Text Options
Store owners can personalize the Notes section in the Text Options settings:
Customize the Notes Heading Label to match your store’s tone and style.
Set a Textbox Placeholder to guide customers on what type of notes to add.
How to Enable and Customize Additional Notes
Access Store Builder: Open the Store Builder and edit the Checkout Page in your ecommerce store settings.
Enable the Notes Section:
Select the Checkout element.
Go to the Advanced Section in the settings menu on the right side.
Toggle on “Enable Notes at Checkout” to activate the feature.
Customize Notes Text Options:
Navigate to the Text Options section under General Settings.
Modify the Notes Heading Label Text and Textbox Placeholder Text to suit your requirements.
Save and Publish: Save your changes and publish the updates to enable the feature on your store’s checkout page.
Key Points to Remember
Optional for Customers: The Notes section is optional. Customers can provide additional details only if they choose to.
Blank Notes: If the checkbox is selected and no notes are entered, the Notes section in the Order Details will remain empty.
Flexible Management: The feature can be toggled on or off as needed, providing flexibility to store owners.
Benefits of the Additional Notes Feature
Enhance customer experience by allowing them to share order-specific instructions.
Easily customize the Notes section to align with your store’s branding.
Capture valuable details that improve order fulfillment accuracy.
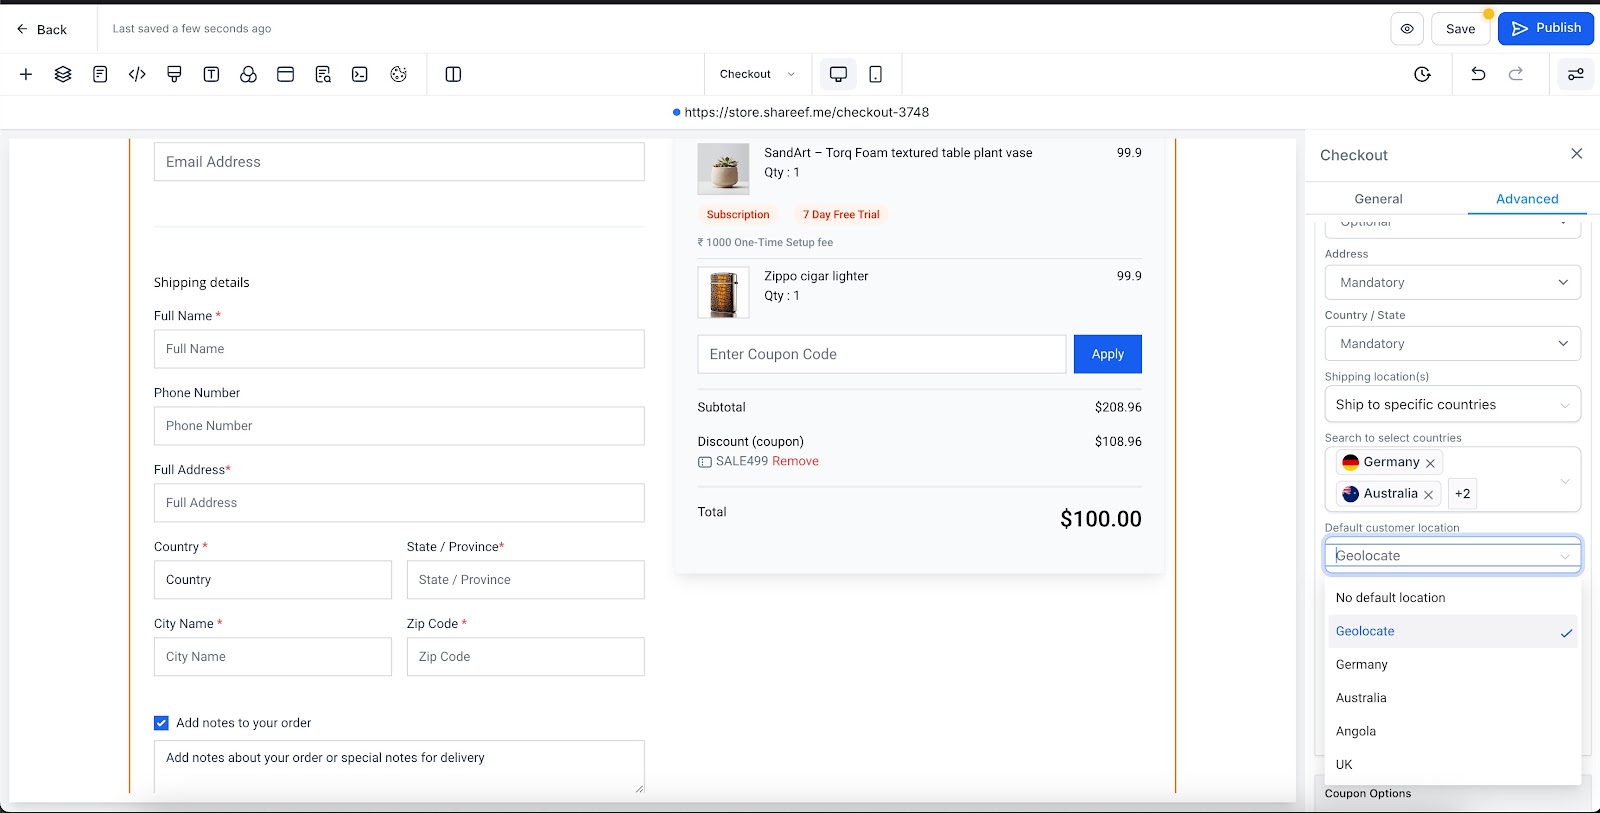
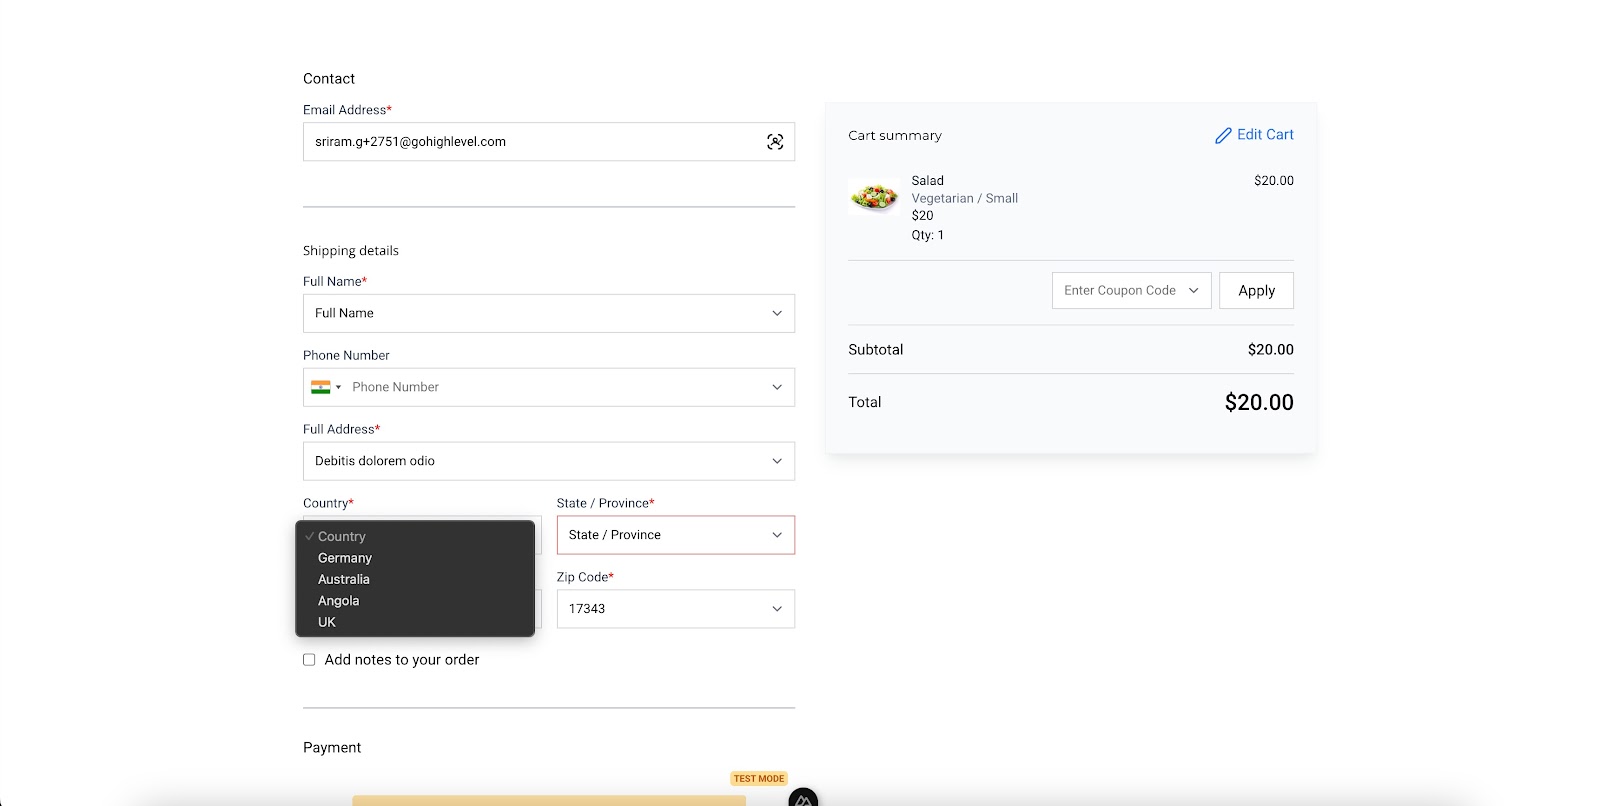
C. Country Selection at Checkout
This section walks you through the new Country Selection at Checkout feature, which enables store owners to manage shipping locations and default customer locations during the checkout process.
Key Features:
1. Shipping Locations
Store owners can control which countries are available for shipping at checkout:
Ship to all locations: Allows shipping to any country, providing global shipping options for customers.
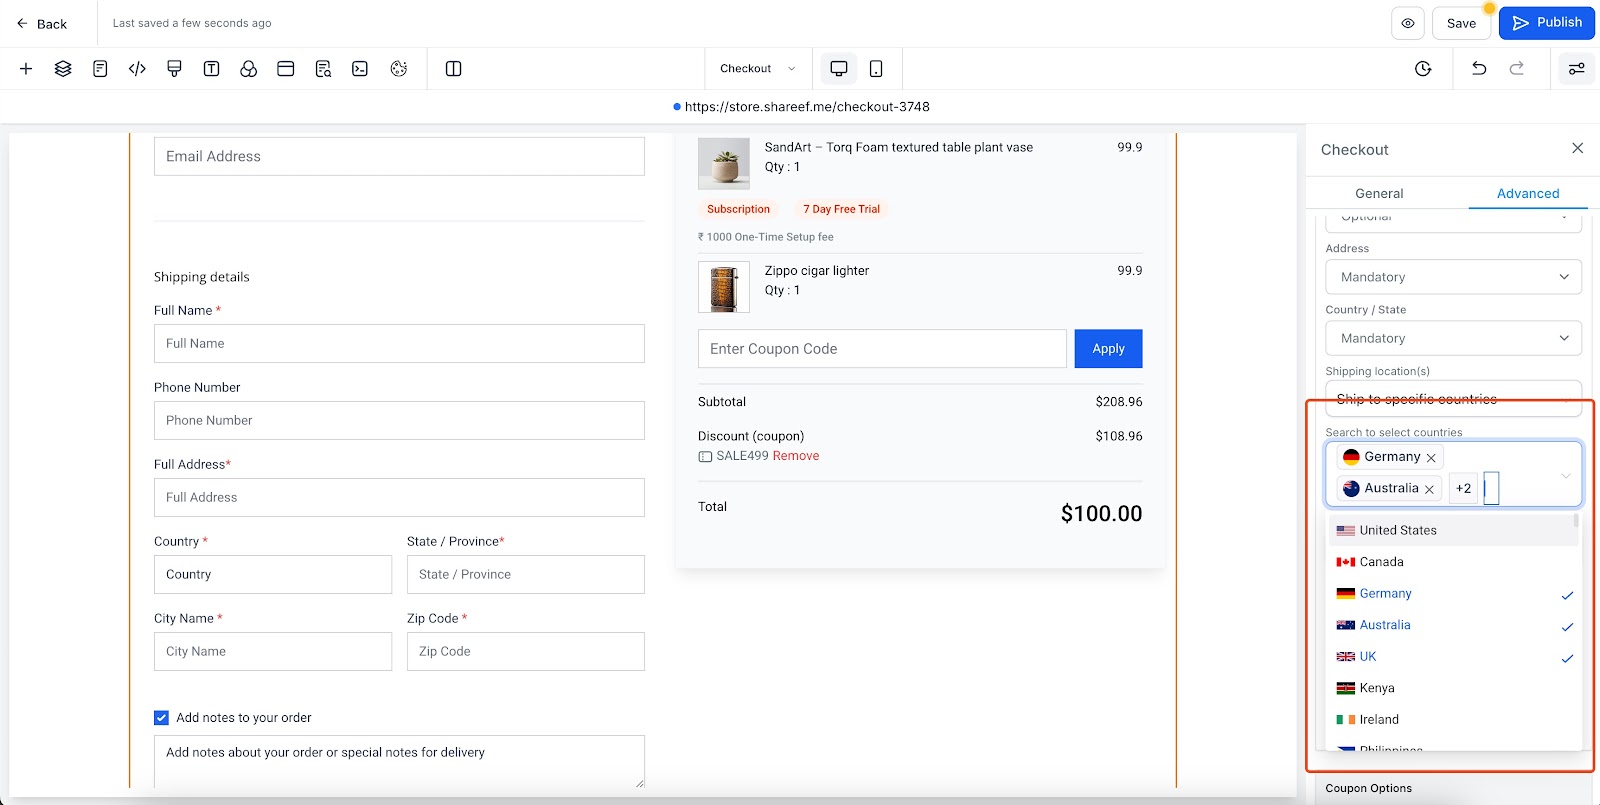
Ship to specific countries: Store owners can select specific countries for shipping. Only those selected countries will be available during checkout.
A Search to select countries field will appear to enable selection of these countries.
2. Default Customer Location
Store owners can customize how the customer’s location is handled at checkout:
No default location: No preselected country. The customer must choose their location.
Geolocate: The customer’s location will be detected automatically based on their IP address.
Show all countries: Displays all available countries for the customer to choose from.
If Ship to specific countries is enabled, only those countries will be shown as options.
How to Use It:
Edit the Checkout Page: Open the Store Builder and edit the Checkout Page for your Ecommerce store.
Customize Shipping Locations:
Select the Checkout element.
Go to the Advanced Section in the settings panel.
Under Form Options, choose one of the following for Shipping Locations:
Ship to all locations
Ship to specific countries (this will display the Search to select countries field, where you can select the countries you wish to ship to).
Set Default Customer Location:
Under the Default Customer Location section, choose one of the following:
No default location
Geolocate (automatically detects the customer’s location)
Show all countries (or only selected countries if Ship to specific countries is chosen).
Save and Publish: Save your settings and publish the changes to apply the new country selection feature to your checkout page.
Shipping Locations:
Search to select countries:
Default customer location:
Checkout Page:
Key Points to Remember:
If the country/state field is hidden, country selection options will not appear.
If no countries are selected under Ship to specific countries, all countries will be available at checkout.
The Geolocate feature provides a seamless experience by automatically detecting the customer’s location based on their IP address.
These updates give you the flexibility to expand or limit shipping locations, offering a more tailored checkout experience for your customers.
D. Auto-Complete Address at Checkout
The Auto-Complete Address feature enhances the checkout experience by providing real-time, Google-powered address suggestions, ensuring a smoother and error-free process. Additionally, this feature enables agencies to set custom pricing and re-bill sub-accounts, creating an opportunity for new revenue streams.
Feature Details
Key Benefits
Faster Checkout Process: Customers receive real-time address suggestions as they type, making order completion seamless.